Aug 22, 2012

Subframe analysis

Well, the subframe bar is as good as ready to be mounted. The time to get the bumpers painted I use to make an inventory of the car's state. A State of the Lord, so to speak. Object of this inventory is  the rest of the subframe, under the engine, in fornt of the Blue Lord. Today I took some pictures and stitched them together to see how the situation is, down under. Well, at first glance it seems to be worse than it actually is.
The brown colour is probably rust water emission of a leaking radiator, from the time when the car was still running. I must admit, I never drove the car, it isn't even registerd in the Dutch vehicle register, because it's an import from Belgium. As I was told by the former owner, a mehanic, he repaired the car he bought from an older man. The mechanic worked with classic Fiats, Alfa's and Lancia's in a grarage in Antwerp. The engine runs smoothly and there is some evidence of major maintenace activities on the left and right cylinder heads. I figure the mechanic fixed the radiator leak too, because the distribution caps are clean, free form the brown emission. Well, I don't know for sure, so I'll have to do some more analyses.
When taking up the subframe I'll have to clean the engine bay and the engine. And mount a fresh radiator. Maybe this will be the first job to do, even before the bumpers. Because of the good weather, the car is now outside my garage, on the driveway. For taking up the subframe it'll have to move inside.

We'll see.


Frog's eye perspective of the frontside of the car, subframe bar above, spaghetti exhaust manifolds left and right, on the outer sides, the subframe arms to the wheels. Center piece is the engine oil sump. In hte background my 146.

The radiator is not the best item on the car.

Rust on the lower side could be the cause of the brown emission on the lower engine parts. But there's no emission on the lower side of the car's frame.

Aug 20, 2012

Subframe bar and PP-plastic bumper treatment

My subframe is sprayed in matt black. I want to mount it as soon as I'm able to disassemble the complete subframe in front of the car. That'll last some time, for my bumpers are to be painted first. Next week I'll fetch the plastic primer and the color paint. And lots of sanding paper in tiny core.

Matt black is the colour for this element

Underneath the car, no one will see a red subframe

The bumpers are roufh on the surface because the plastic is untreated. I reckon they were painted simply on the plastic, without a prime layer of filler. 

Front QV bumper

Rough and untreated surface

smooth on one spot...

... rough on the other

The flaps for the foglights are different in surface, 
left hard and sandable, right soft and difficult to treat with sanding paper.
The primer will make it easier to sand and smoothen the surface.

Bumper sanded

Detail of the sanding of the bumper corner.
Primer and filler will make this part smoother too.

I'll keep you posted


Aug 17, 2012

QV steering wheel: check


At last, the QV-wheel is fitted and cleaned and functional. Looks good, doesn't it?

The scratches are maritial evidence of the driver.

In an overview, I guess the seats and panels will have to move for QV seats, some time. 
For now, I'm quite content.

Aug 16, 2012

Steering column, won't get fooled again

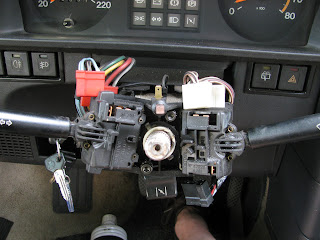
Today I did some fiddling again. The Itialians are geniuses in design, it always looks good, but the inner solutions aren't always that practical to work with. Example is the steering Column mantle. Once it is off, you can work around the steering column perfectly. For mounting a new starter lock I had to dismantle the cloumn. Now the lock is operable, the remantling of the mantle is horrific.
Since it is plastic, and some years old, it is hard to bend. The two mantle pieces, upper and lower part, disclose around the column, and have to touch some mounting points on the column. Once that fits, the two mantle attachement points have to meet these points. And then a long screw has to assemble the three parts. On the two lower points. The difficulty lies in the fact that the two mantle parts disclose the cloumn and the attachment point, so there's  no view on your work at all. Here starts the fiddling about, like Uncle Ernie did.
When you succeeded in mouting the four screws of the mantleparts, there's a fifth screw te tighten on the lower part, hjust above the choke handle. When the fitst part as described above, was succesful, this section won't be a problem. When you fiddled aboout too much, here's some more fiddling to do. Mind when fixing the mantle you have to position the steering wheel, the wheel might not be exactly in the middle of the mounted mantle.
I succeeded in about one hour and a half. Thank you Uncle Ernie (by the way, The Who's a great background music to listen when fiddling about, this one is obligatry, My Genereation is for the older petrol heads and this one's rather relaxing).

The claxon's power device under the wheel broke down. 
My cellars's a good source for substitutes (which is another great song of The Who)

The steering column mantle is finally in position.
 I even succeeded in mounting the starter's lock rubber thing)

The fifth screw

Some nasty scratches on my replacement QV-wheel

Original QV-wheel: G. c.p.

And when my Bleu Lord project is done, I'll be driving this one!

I want it, I want it, I want it!


Aug 14, 2012

Once more the E-type

Jeremy Clarkson is lyric about hte E-type, that was about to become 50 in 2011. What a billiant little film for a truly beautiful car. And then that ending... marvellous!


Here the E-type design is explained by car designer Ian Callum:


Talking about design. Here the Jaguar even becomes a tubulare, not quite a light weight...


Some more jaw-dropping E-type films:


Fot this blog is about restaration, here's one from an E-type (mind especially the music!)


Aug 12, 2012

Steering Wheel

Well, the day before yesterday I had my SW-steering wheel cut off from the steering axis. The wheel wat totally disrupted, I couldn't operate the steering wheel puller. Yesterday I fiddeled about and made some space around the axis and finally I was able to install the puller in place. Just a good half turn with the puller was sufficient to extract the wheel form hte axis.


So was I, what a mess!


Here's the pull!


I changed the switchunit, some switches didn't work flawless and direct. It even was a bit greasy 
(from the fiddling I reckon...?)

I even changed the starters lock, with the doorlocks, in one set. Now I only have to use two keys (starter cq doorlock and the petroltank lock)

Aug 10, 2012

Steering wheel, another QV adaption

While waiting for my paint and Brunox, I wanted to install another steering wheel, in my cellar I had the leather version of my old QV. The mounted wheel in the Blue Lord is a standard plastic one, and when disassembling it I noticed a disrupted attachement. While turning the wheel I noticed a flaw in the circular movement.

Standard wheel of type 2 Alfa 33.

The disrupted inner attachement life of the standard wheel mounted in my car. 
I hope it isn't caused by a crash...? With a hammer  I tried to disassemble the wheel from the steering axis. You can see some damage already from my hammering on the round whole in the lower left part of the picture.

While disrupted, I couldn't install the steering wheel pullers rods.

With some effort I maneged to install one rod, slightly. 
Not enough to get some traction on the puller.

One option: cutting the upper part of the wheel off the lower part, to clear the way for the puller rods. 
The wheel was disrupted anyway.

Tomorrow I'll pull out the lower part of the attachement, and install the leather wheel.

Aug 9, 2012

QV-adaption: windbreaker

Today I installed the windbreaker on the passengers side. In fact an easy job. With the following pictures I'll show you how it's done (I was inspired by this bloke's video).

When the windbreaker is second hand, make sure it isn't damaged. Clean it thoroughly, especially between the sides to mount in the door.

Remove the doorpanel.


Loosen the window bolts and release the window out of the windowmechanism. 
Leave the window in the door.

Before you tear out the rubber inner frame, remove the little rubber struts, if there.


Tear the inner rubber out of the window. Start in the bend of the door. When it is released leave this part hanging on the door. The rubber goes all around the door and you don't have te remove it totally.

After releasing the inner rubber, remove the hard plastic outer window frame. Start here at het long sides. Because of the sturdiness of the plastic you'll have te teaar really hard end do it step by step. Once it comes off, you're practical done.

Remove the mirror by loosing the little inbus screws and the big mutter around the big whole on the inner side. This can carefully be done with a screwdriver or a little steel rod in one of the four spaces in the aluminium mutter.

Once the frame is out of the doorwindow, use the occasion to clean it an look for dents or scratches in the paint onder the rubber. Tip the bare scratches with paint to prevent rusting.

The installing of the windbreaker begins

Start by putting the windbreakers end in the lower corner by the mirror. Make sure it sits under the horizontal rubber.

Once the windbreaker is set in the window, try to place it in the upper corner, equal tot the vertical hardplastic cover. If possible adjust it. Make esure to push it really hard in the doorframe.

The upper back corner is critical, make sure there is a perfect overlap. Here it isn't.

Once the windbreaker is set, push the soft inner doorrubber in the windbreakers inner.


To mount the doorpanel here's a tip:
Move the doorlock strutter through the panel's whole and turn it  slightly tight.

Now you'll have your both hands to set the panel right in the door (when you don't fixe the panel in the lock's corner this is a #@$%^&@!-job!) The inner white frame of the panel has to be set behind the doormetall.

When the panel is tight, the mirror is installed and the doorhandles are on, ready is Kees.

Nice accessory, isn't it?

The biggest advantage of the windbreakers is that you can provide you and your passengers with fresh air by leaving the window slightly open on hot and rainy days. Even when the car is sitting down and empty. Burglars won't have a quick chance.

Now the driver's side and the QV look is evolving quick.
Anyone with a spare windbreaker?