Jul 1, 2018

Mannen praat

Gisteren was ik voor het eerst in mijn leven op een “mannenpraatavond” in Café de Ster in Roermond. Nu denk je meteen bij mannenpraatavond dat hier zware problemen aan de orde kwamen (alcohol, sex) of dat de relatie van de figuren in kwestie onder druk staat. Therapeutische gesprekken? Niets van dit alles.
Mannen zijn van nature geen praters en als ze al praten over zwaarwegende zaken, mag dat geen naam hebben. In de café is het niveau al gauw op teek niveau, maar ook dat was hier niet aan de orde.
Het ging over toys for boys, spullen, sjieke dinger; auto’s. Zelf ben ik meer een sleutelaar dan een rijder, maar er waren ook rijders die het stadium van sleutelaar nog moesten doorlopen. Met de meest smakelijke verhalen van dien. Tot mijn geruststelling ervoer ik dat mijn sleutelstadium van 9 jaar voor een project nog niet het record was. Sommige lotgenoten verkeerden in een constante staat van “niet mobiel”zijn. Daar konden we als lotgenoten gelukkig goed over praten, elkaar een hand onder de riem gestoeken. In die zin werkte de avond wel enigszins therapeutisch. Hier en daar liep de emotie toch even hoog op, vooral bij het zien van de Saab Sonnet ll motor, die tot in de puntjes was opgevoerd. Dat ontroerd mannen, daarmee komen we op gelijknivo, even alles eruit gooien, de ziel luchten.
Maar echt zwaar is het niet geworden.

Wil je meepraten, stuur even een mailtje naar tulipwoodracer at gmail dot com.


Apr 7, 2018

156 several parts

Today was a good day. We finally decided not to move to another house. Our daughter made a clear statement about her studies. I replaced the radiator and the themostat I got from my buddy 33 driver Henk.
Its not nice working on the 156: the car is packed with plastic things and everything is connected to another. Parts have to be removed for reaching to other parts. To replace the radiator there are two options: doing it with or without removing the front bumper. I started removing all parts attached to the radiator without removing the bumper.
The clamps to the hoses are simple but not multi usable. They have to be loosened with a simple twitch of the screw driver and attached again with a pair of pinchers. If it works. If not I replace them with a normal clamp to be fastened by turning with a screw driver. I had to remove several of them, smaller and bigger diameters. The bigger new type work better reusing. The smaller types I replaced.
Getting the radiator out of the engine compartment is a job of patience. After removing the air intake, the airfilter housing and the fan, the screws for dismantling the radiator become reachable. At the engine side. At the front it is more difficult when not removing the bumper. The little grill at the bottom of the bumper has to be removed to reach for the four screws that hold the airco radiator.
Removing the grill is a painstaking job, because of the attachment of the plastic grill as a one way fit. Four of the eight ends broke during the removal. To fit the grill right again I have to remove the bumper after all.

I also fitted a new thermostat I got from my budy Henk. Several hoses and electric lines are attached to this part. Removal of the hoses as described above, the electrics got off easy. Two bolts and the part was out. Refitting came with old school clamps for the hoses.

Refitting all parts went better as expected. The only slight difficulty was the fastening of the radiator screws at the bottom: two small screws to fasten a plastic screen to the radiator to stream the in flow to the cooling parts.

Tomorow I'll remove the front bumper to clean up al adjacent parts and derust the parts corroded.

Mar 8, 2018

Shocks part 3

After mounting the new absorbers, the things rattled and rambled due to a too wide mounting cilinder. So today I dismatled the whole axle again and looked for a sloution for the wide cilinders.
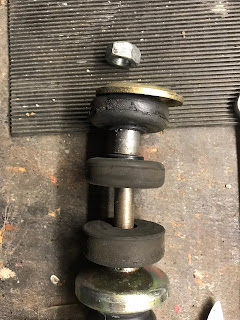
The bottom mounting concept of the shock absorber is  a simple rubber ring with a centre cilinder. This cilinder has to hold the tightening bolt with the flexible holder at the axle.
The cilinder is hold by a rubber inlay like a suspension bush. This bush was to adapt to tne new absorber.

After all a quite simple and satisfying job. With a good result. The absorbers work well, a thourough test drive will be done after the salt is out of the streets.
First I had to remove the stabilisation rods to get the axle free. 
Than jack up the whole car and then push up the axle to loosen the suspension. 

The newly treated coil spring, just for the sake of it.

Mind the moments to tighten the bolts of the stabilisation rods

Removing the shock iout of the lower whole in the axle after jacking up the axle

Pushing out the wide bushes from the new shock

Almost out, the rest can be done by hand


The bush removed out of the new shock absorber

The parts out of the old shock. I used the new rubbers 
of the new shock and the old cilinders. 
Both old and new cilinders had the same outer diameter.

Pushing in the cilinder and rubber parts in the new shock.
Use some grease to make the proces easier.

The result is good

Newly fitted connection part from the shock absorber to the axle

Parts necessary to push in and push out the bushes

 The absorber is ready to be fitted again

Newly fitted absoerber on the axle, bottom side view

The mechanic and his challenges in full action

Succes.

Work place


Feb 17, 2018

Shocks 33 continued

Last week I started replacing the rear shock absorbers of the Blue King. In my last post I reported that I bought some cheap ones in Austria via Ebay. Now was the moment to fit them.
I studied the manual, it seems to be a quick job, no special tools needed, except a special tool to jack up the rear axle (a fixed axle, called de Dion). But here does the manual deviate form my actual car. So I had to be creative to solve this issue. In stead of jacking up the whole axle in one turn, I could do it side by side. The brake lines which I had to disengage, could stay put. Another time saver.

By dismantling the left and right suspension I noticed everything came loose in a jippy. Although the springs where somewhat rusty again. Once the old shocks were out, I compared them with the new ones. Some differences I noticed. Especially the rubber head on top of the shockabsober altered from the old ones. so here too I had to figure out a solution. Also the axle to fit the shocker on the rear axle of the car was wider.
In the old situation in the upper part a metal plate rested on the central axis of the shocker. Two rubber parts above it were closing in the metal of the car, the suspension dome. In het new situation a metal dome shaped plate was the upper side of the shocker. Fixing it with the plate of the old shocker would mean metal clashed to metal. I think that wouldn't be pleasant in the long run. So I made a new rubber piece out of the old shocker and put it on the metal dome piece of the new one.

By disassembling I did not notice the difference between the old and the new absorbers. It seemed that the new mounting cylinder at the bottom of the absorber was wider than the old one. When I assembled the pieces I figured the effect would be minimal. But it was not. The first test run gave a rambling and a on easy sound. So I had to dismantle everything again...


A set of new shocks from Austria

Had to dismantle the rear suspension and axle. The brakes lines could stay in place

The refurbished coil spring after three years

The upper part of the shock to dismantle in the boot

The spring

The inside suspansion chamber, only slighty rusty

My little stove to keep me warm in winter

The top ends of the old (left) en the new shocks 
needed some adaptation before mouting again.

The new shock with the old parts would 
make a lot of noise: iron plate on iron dome


Adapted set up with a rubber part on the iron dome, on top of that the rubber parts that hold the shock in place when fitted in the top part of the suspension chamber

The bottom part with the vertical axis, through the axle.

The noise when fitting the old setup in the new shock bush

This new bush was wider than the old.


Thei old bush fitted perfectly


Jan 21, 2018

Shocks 33

During our autumn trips in the King Bleu, we noticed the rear axle was very lively. Not pleasant when sitting in the back and driving over trafic bumps. During the Christmas holidays I did a short visit to my Vakgarage /Alfa Romeo dealer just to ask what it could be.
Their main mechanic Jan grabbed the keys and asked wether I'd go for a ride with him. This man was the guy I asked in 2007 wether he was able to weld my sills and rusty spots on this particular car, the King Blue. We did not come to an agreement, but that was okay then, for both parties.
So driving along in a fierce style, revving the boxer, Jan tried to look for trafic bumps and wholes in the road. After we had a rough ride, for testing purposes very appropriate, Jan put the car on the bridge in the workshop. His conclusion was a rear left worn shock absorber. He advised to replace them both in the rear.
I asked to make me an offer for this parts or for the complete job of replacing the two shock absorbers.

I already looked for a pair on the interweb, but couldn't find any. The ones I found were extraordinary expensive. Creemers called me the other day for the job and offered to do it for 440 euros. "Only in case" the recptionist remarked "the parts fitted can be removed easily" . Damned, I overhauled the complete axle in 2012, everything, except the absorbers, is new!
So that's a lot of money for this old 33. So I got back in the interweb surf position. The original Alfa's had fitted Monreo shocks, number E5032, but they are not available anymore.  Finally I found a set of new Boge-Sachs Nr. 312 057 shocks in Austria, for a very reasonable price of 54 euros, for the pair including shipping. Order has been made already.


The set up of the rear suspension of the 33 is quite simple. 
Just mind the good tightening moments and the good setting up of the car.


So this will be a nice job for me in the next weeks. Hope temperatures will not drop again...


After posting this, our dog Pip awoke.


Dec 30, 2017

Winter works 2

The stove is nice and cosy, but with 13 degrees Celsius not necessary. But works are going on. The driver's door had a malfunctioning electric window opener. It went as slow as a snail can go. So today I was back in my garage again. Top2000 music can be heard while watching the videos.

This one was a little trickier, then the last. But with some perseverance I did it again. Looking now for the before and after videos.


A prettyexhausted window operator is working here.


My original plan was to dismantle the motor 
of the electric window mechanism, 
but that was fixed to the complete up and down moving system. 

Three bolts for the motor

Plastic coverings removed out of the door

My loyal buddy can't miss me when working on his 33.

The complete mechanisme out of the door, five bolts.

No opening of the motor, one cable goring round, 
several covers causing trouble while functioning after 28 years.

The little motor in one piece

Great stuff made in Italy

Specs

The cable go round


The cable fixed to the up and down holder of the window

And out it is, cleaning

Trying to remove the window holder. 

No chance, thsi is one way ware.

Cleaning the rail for the holder to guide.

Cleaning teh wheels

Cleaning the window-moving-left-and-right-things

Fiddling an half hour to get the cabel fixead again 
&^$$^&%&*^@!@#!

My mother in law's screw driver did the job.

Testing the overhauled piece

Brushing the window seals. Dirty!

After testing movint het system back in the door.

Almost on its place.

The window touched the window frame, just adjusting it a little.

This little guy does the trick, a little.


Ready for the next spring to come.